
Universal Plug n' Play
(UPnP)
UPnP is a worldwide standard for simplifying network configuration.
It is used by tens of millions of people worldwide in gaming,
home security, streaming services and the growing
list of Internet-of-Things (IOT) devices in your home.
Your enclayve device uses UPnP services.
However, UPnP capabilty can be disabled by home network installers,
and in that case it must be manually enabled.
Enabling UPnP is a common practice when
an Internet-enabled device is in your home.
Instructions by Service Provider
Instructions by Router Manufacturer
"Double NAT" Setup
Double NATGuidance
Mesh Network Setup
If the enclayve setup indicates you have a "mesh network" or a "double NAT",
it means that there are multiple routers in your home, typically called a "mesh network".
When selecting a WiFi network in the enclayve setup,
you must choose the network name (the SSID) of the WiFi router that has direct connection to your Internet Service Provider.
The picture below illustrates the proper WiFi network to choose:
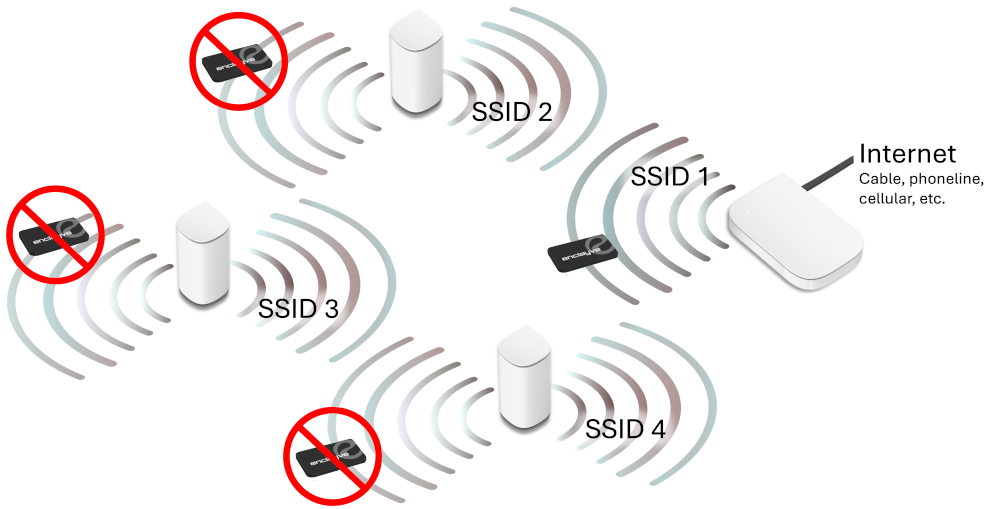
(Note that your router devices may not look like the ones shown here)
If this is not physically possible, then the mesh router closest to your enclayve device must be programmed for "bridged mode". Consult your mesh network's manual for instructions to do so, or contact enclayve by email for support.
Enable UPnP
Google NEST and Google Fiber
Google NEST: Routers delivered with the Google Nest Internet service typically have UPnP enabled by default. However, since you are here, it was disabled and must be re-enabled with the following steps:
- Open the Google Home App
- Go to WiFi -> Settings -> Advanced Networking
- Turn on UPnP and power cycle the router.
- Go back to the enclayve App and perform the setup again.
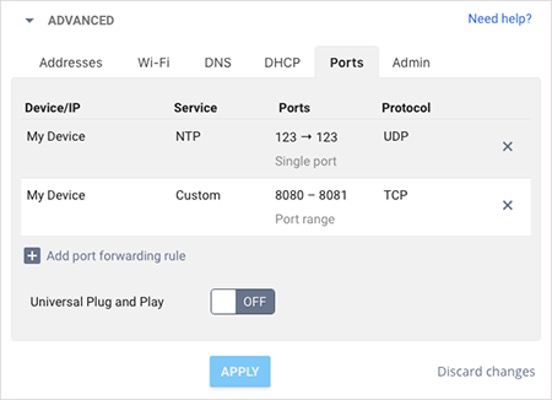
Google Fiber: Routers delivered with the Google Fiber Internet service have UPnP disabled by default, so you must enable it with the following steps:
- Open the Web Interface and log in
- Go to Advanced and click on the Ports Tab. Set Universal Plug and Play to ON, click on APPLY as per below:
- Go back to the enclayve App and perform the setup again.
Enable UPnP
Spectrum
Routers delivered with the Spectrum Internet service typically have UPnP enabled by default. However, since you are here, it was disabled and must be re-enabled with the following steps:
- Open the My Spectrum App on your phone
- Tap the Services tab at the bottom
- Under "Your Spectrum Network", select the Router
- Scroll down and tap Advanced WiFi Settings (or Advanced Settings)
- Find the UPnP option and use the toggle to set it to On
- Select the back arrow or save button to apply and save the changes; your router may reboot
- Go back to the enclayve App and verify Global Access again (note that it may take some time for changes to take effect, so it may take a few verifies)
Enable IoT
Verizon Home Internet
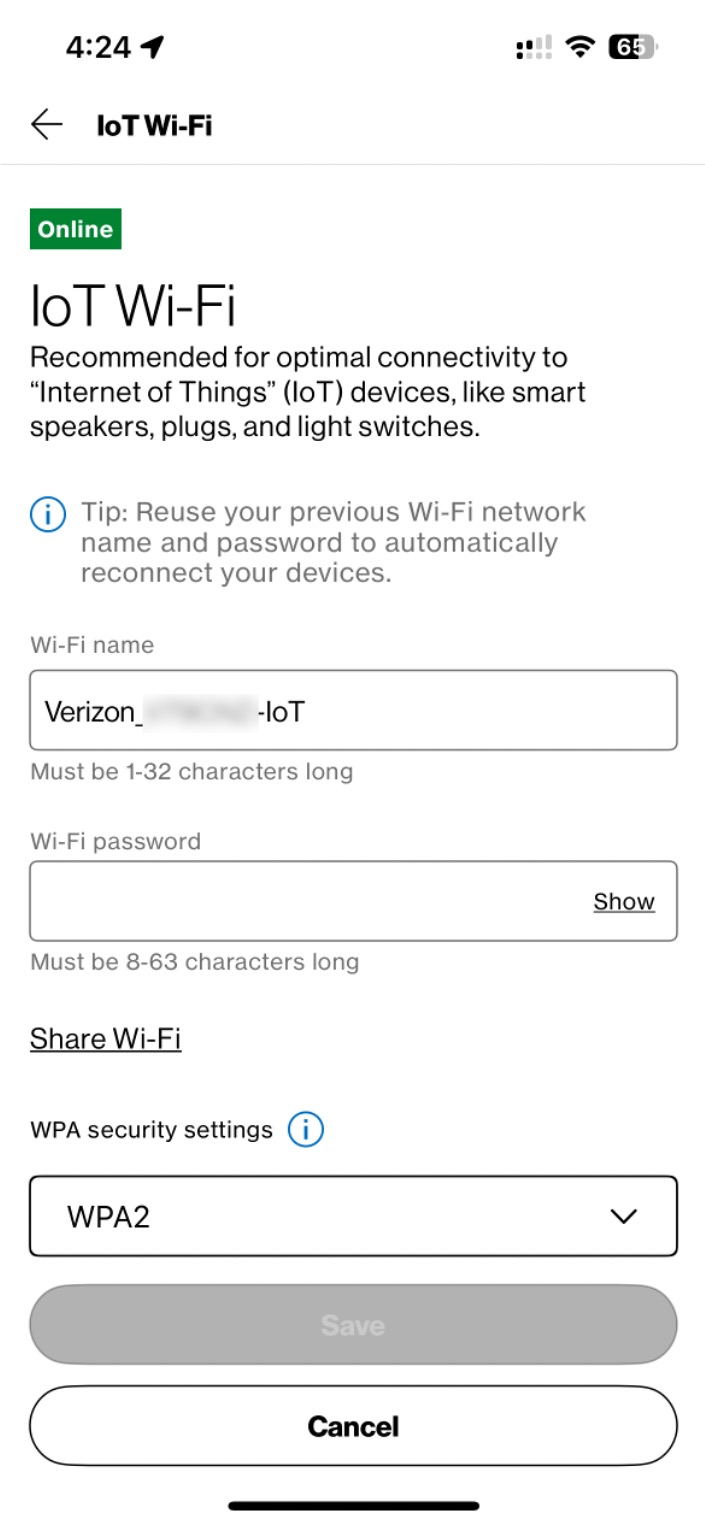
Routers delivered with the Verizon Home Internet service typically have a section called IoT (Internet of Things) which is essentially the same as UPnP. In the My Verizon app, enable IoT with the following steps:
- Open the My Verizon App. Click on the Account tab at the bottom of your screen.
- Scroll down until you see “Home devices.” It should have a picture of your router with your account number. Click on it.
- It will take you to the home internet tab. Scroll down until you see the detail tab. Click on “WiFi Network” which has the following Primary, Guest, and loT options.
- Select loT, which should be off by default. Click on the disable option to enable it online.
- Go back to the enclayve App and continue the setup.
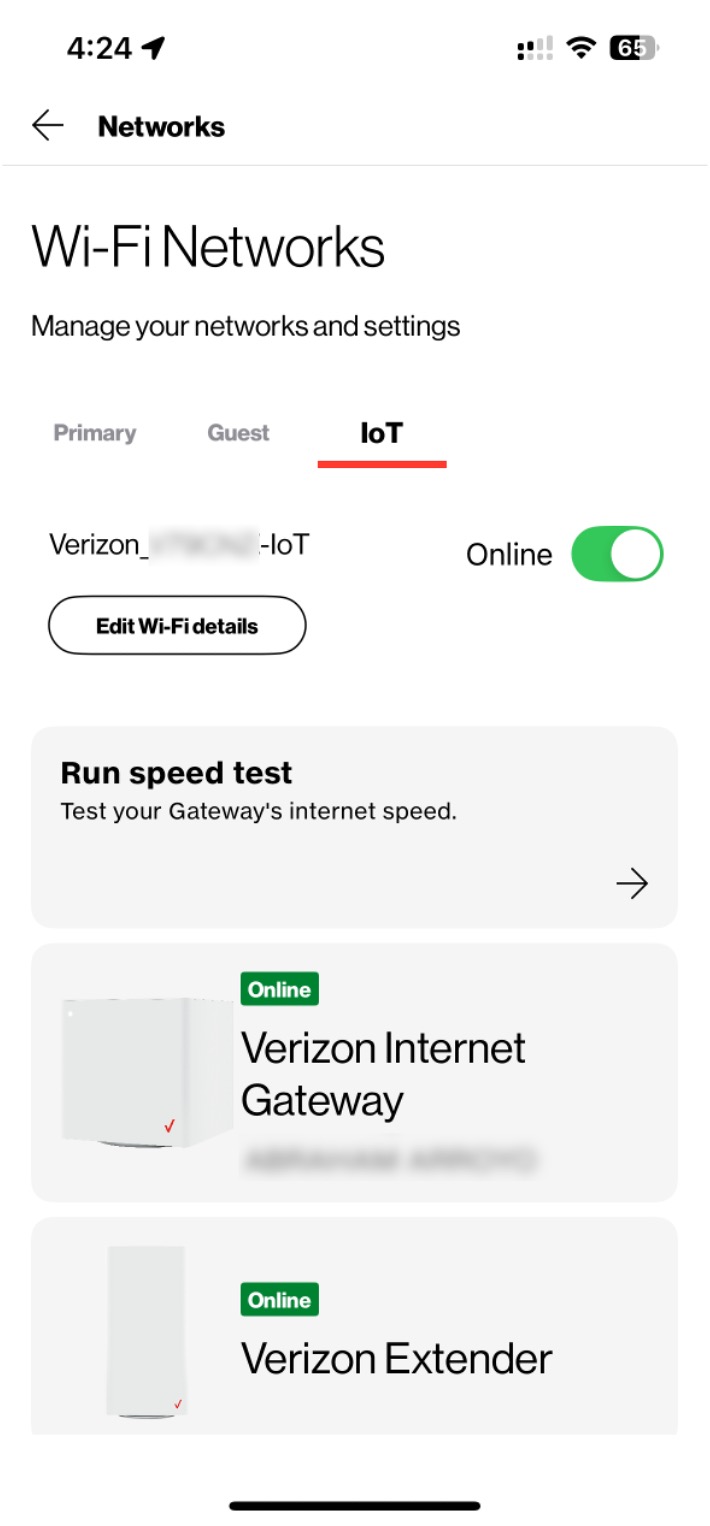
(Note - your screen may be different than the above)
(Note - your screen may be different than the above)
Enable UPnP
Cox
Some (but not all) routers delivered with the Cox Internet service have UPnP disabled by default and you must enable it. Here are the steps:
- Open a browser to your router's web interface. This is typically the IP address 10.0.0.1. The enclayve App tells you the correct address, which can also open the browser for you. However, you can type it directly into your browser. It will present you with a login page, where the default login is:
Username: admin
Password: password
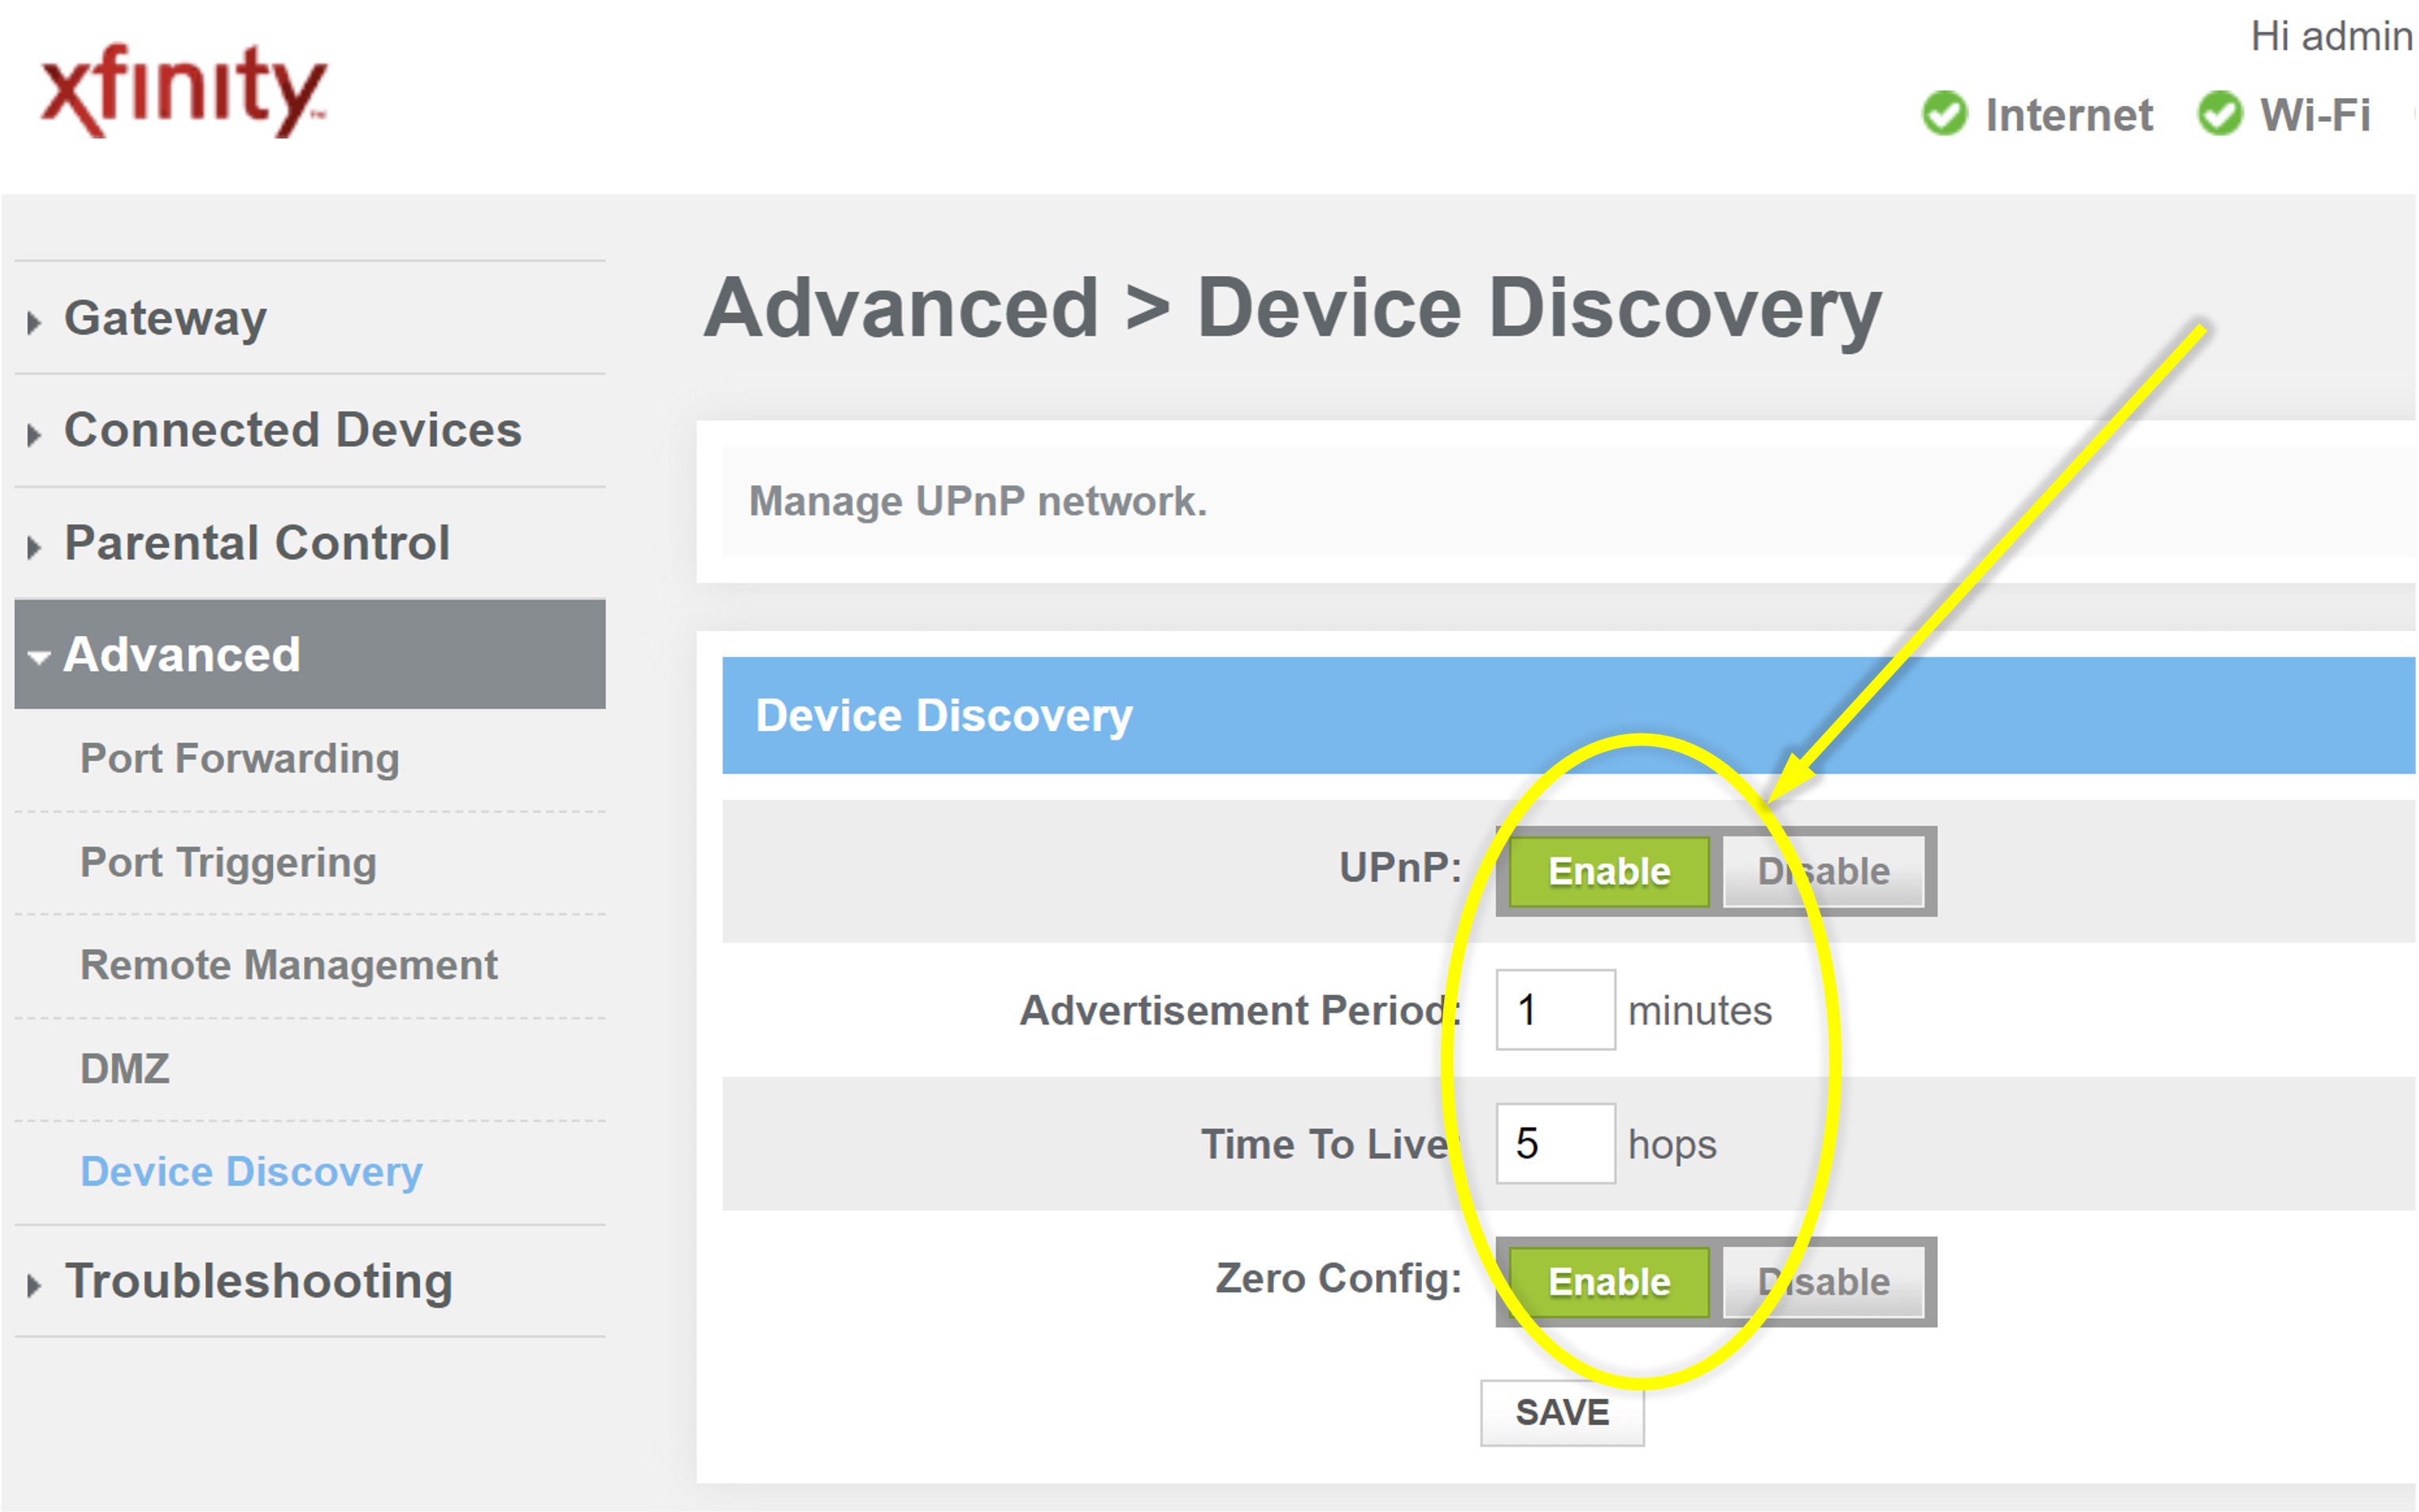
(Usually it will ask you to change this password and log in again.) - Open the Advanced tab and chose Device Discovery.
- Click on Enable for UPnP and Enable for Zero Config and click on SAVE. This is shown below:
- Go back to the enclayve App and perform the setup again.
(Note - your screen may be different than the above)
Enable UPnP
T-Mobile Home Internet
Gateways delivered with the T-Mobile Internet service typeically have UPnP disabled, so must be enabled per the follwoing steps:
- Open your gateway web interface.
- In some gateways, go to the Settings tab and select Firewall. Tap on the UPnP button to enable it, as shown below:
- In other gateways, go the Expert tab and select UPnP. Tap on the buttom to activeated UPnP and click on Save, as shown below:
- Go back to the enclayve App and perform the setup again.
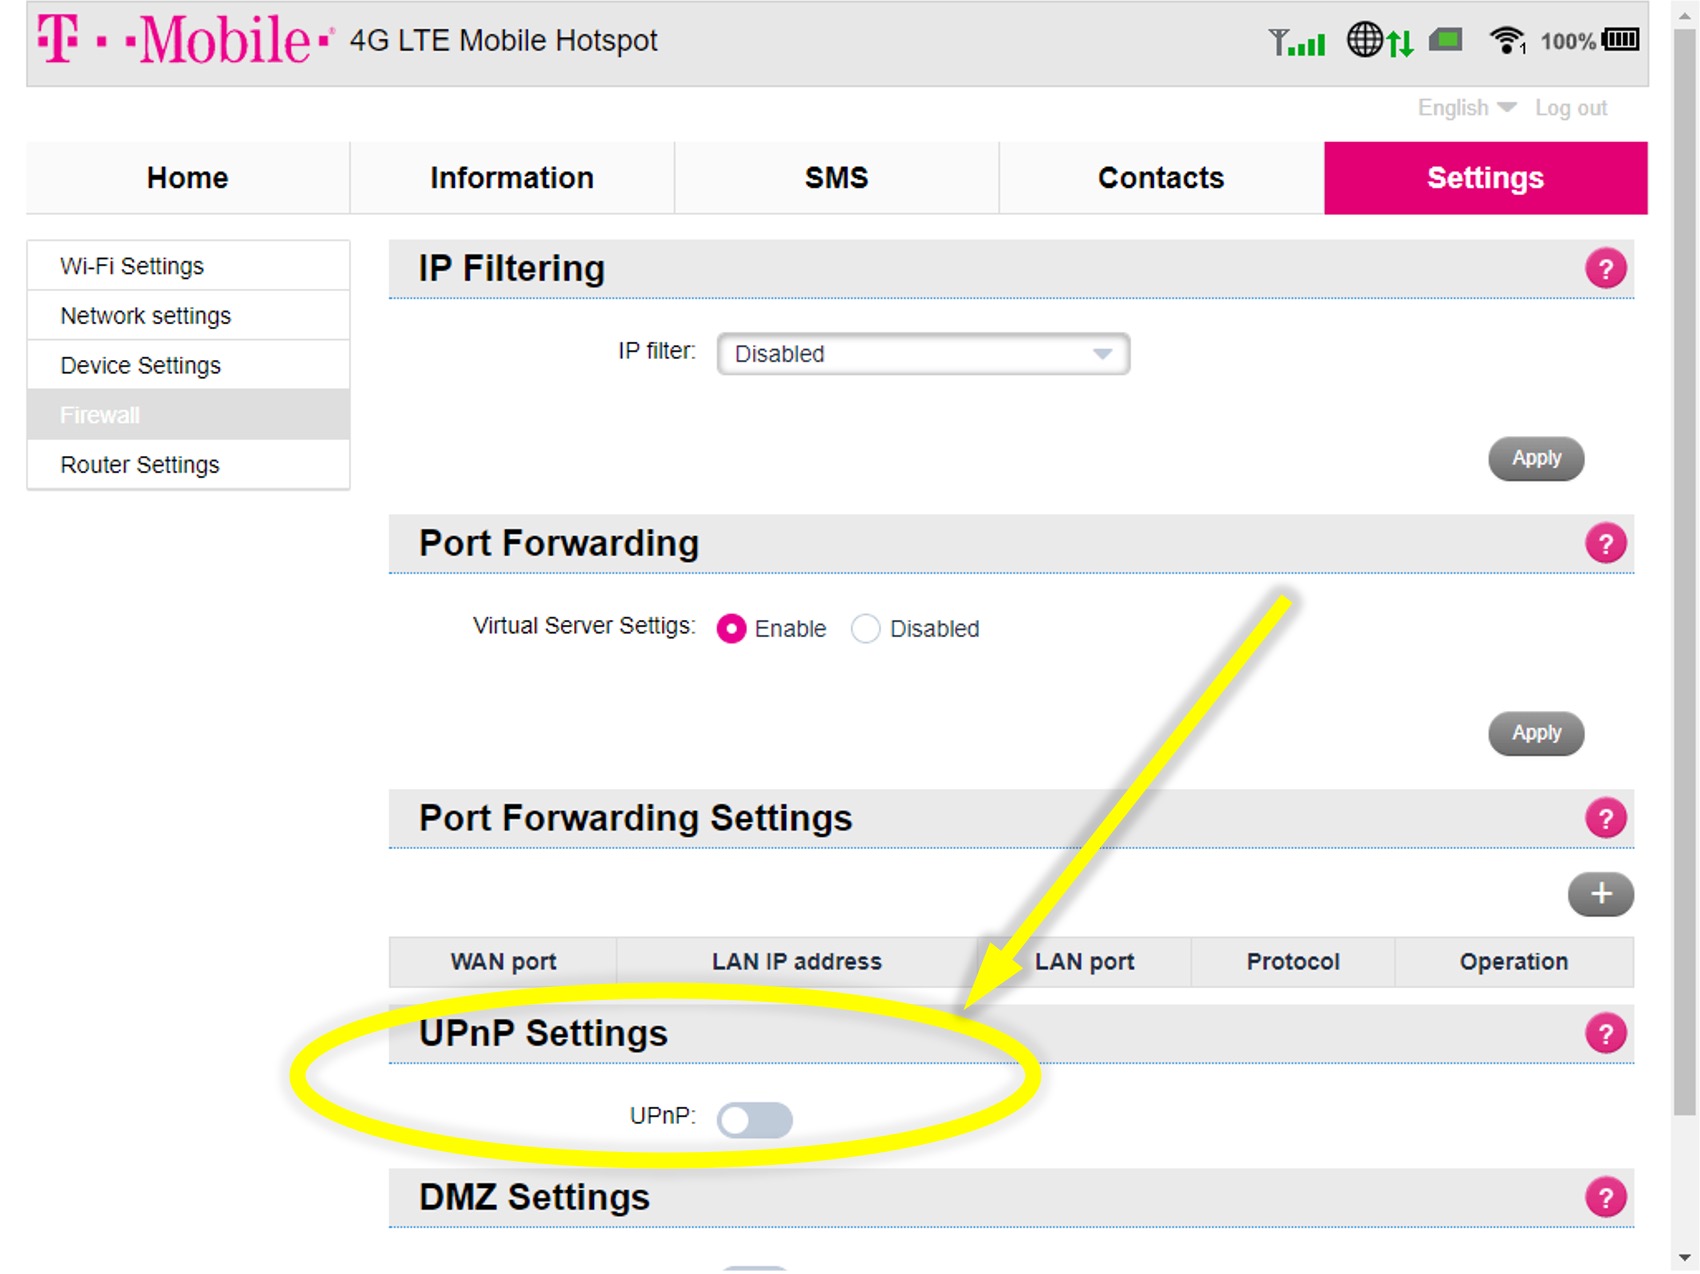
(Note - your screen may be different than the above)
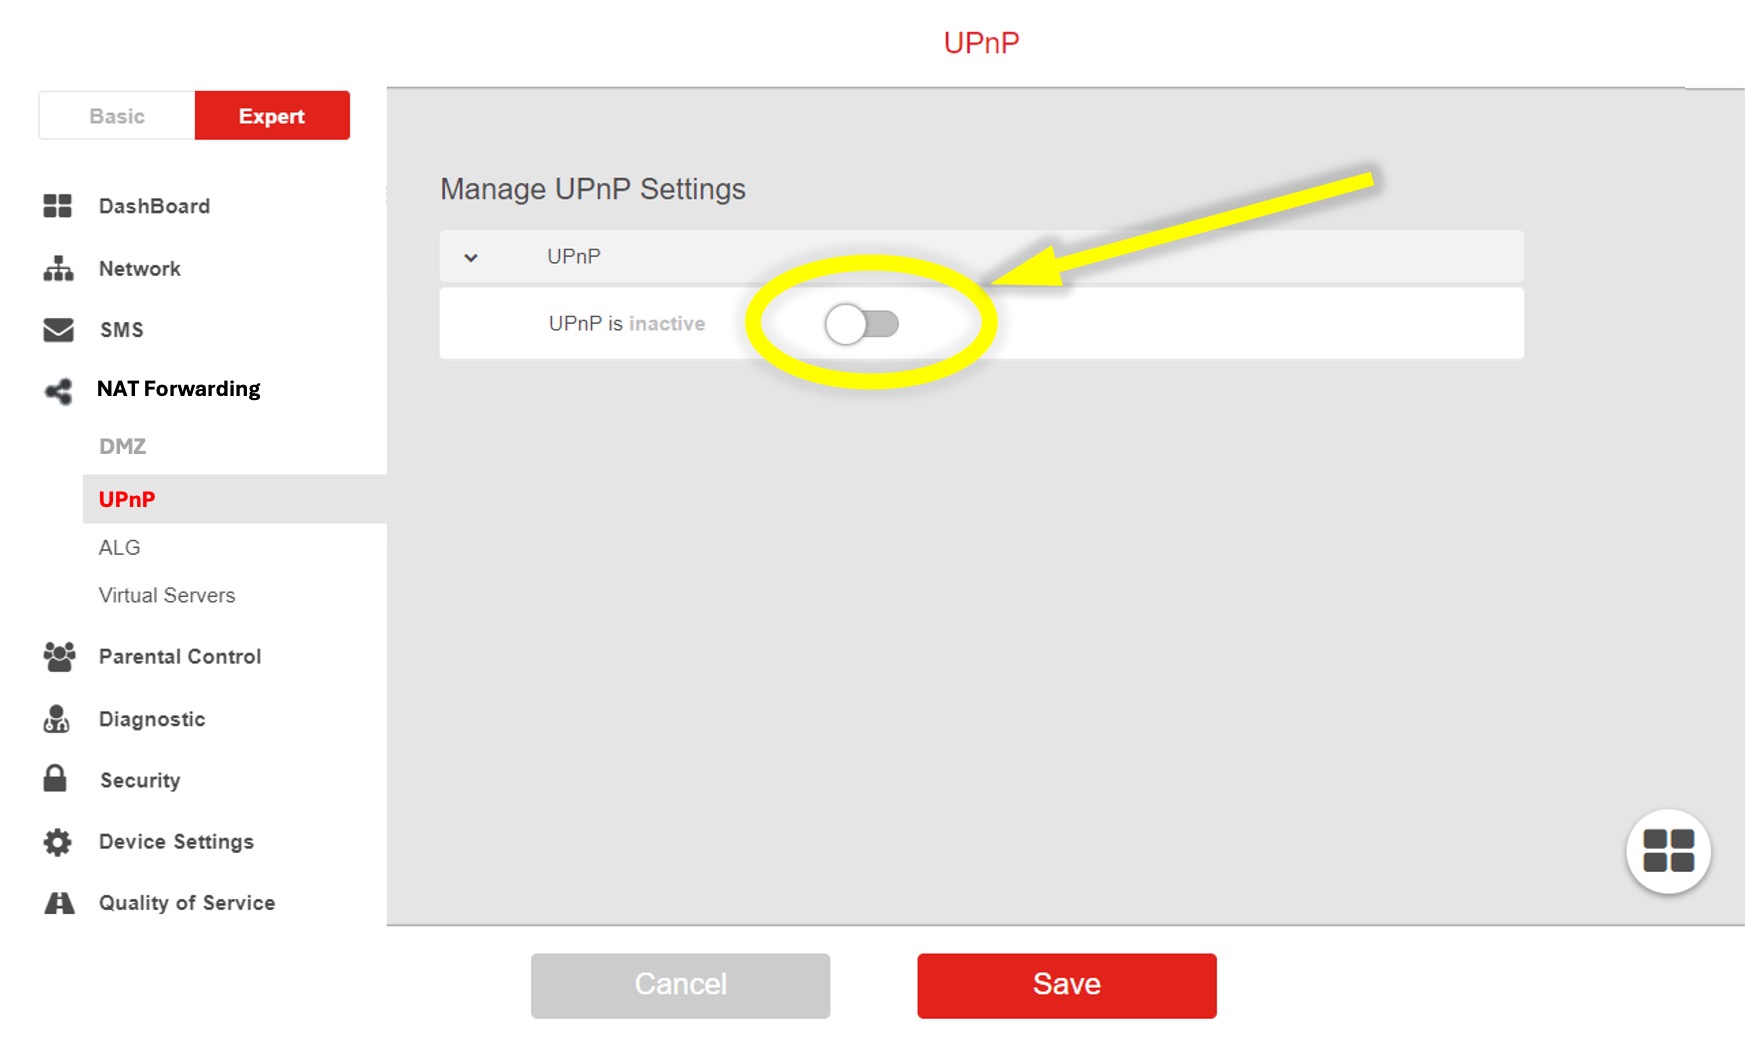
(Note - your screen may be different than the above)
Starlink
The Starlink system does not directly support UPnP, so another 3rd-party service or router is necessary for compatibility with enclayve.
In the future, enclayve will support the IPV6 standard, which will be compatible with Starlink.
At this time, consult online resources that identify your options for implementing UPnP or Port Mapping services with Starlink. You will need the following technical data about your enclayve device to configure a 3rd-party router or service:
Enable UPnP: Instructions for many different 3rd party routers is avaialble here.
or
Enter a Port Mapping: Add a port mapping (also called port forwarding) for your enclayve device. This is a router setting that typically needs the following information:
Service Name: enclayve Ports: device port to device port Device: device IP address Type: TCP only
You need to know the local device IP address and port number, which is given in the Device Management screen of your app.
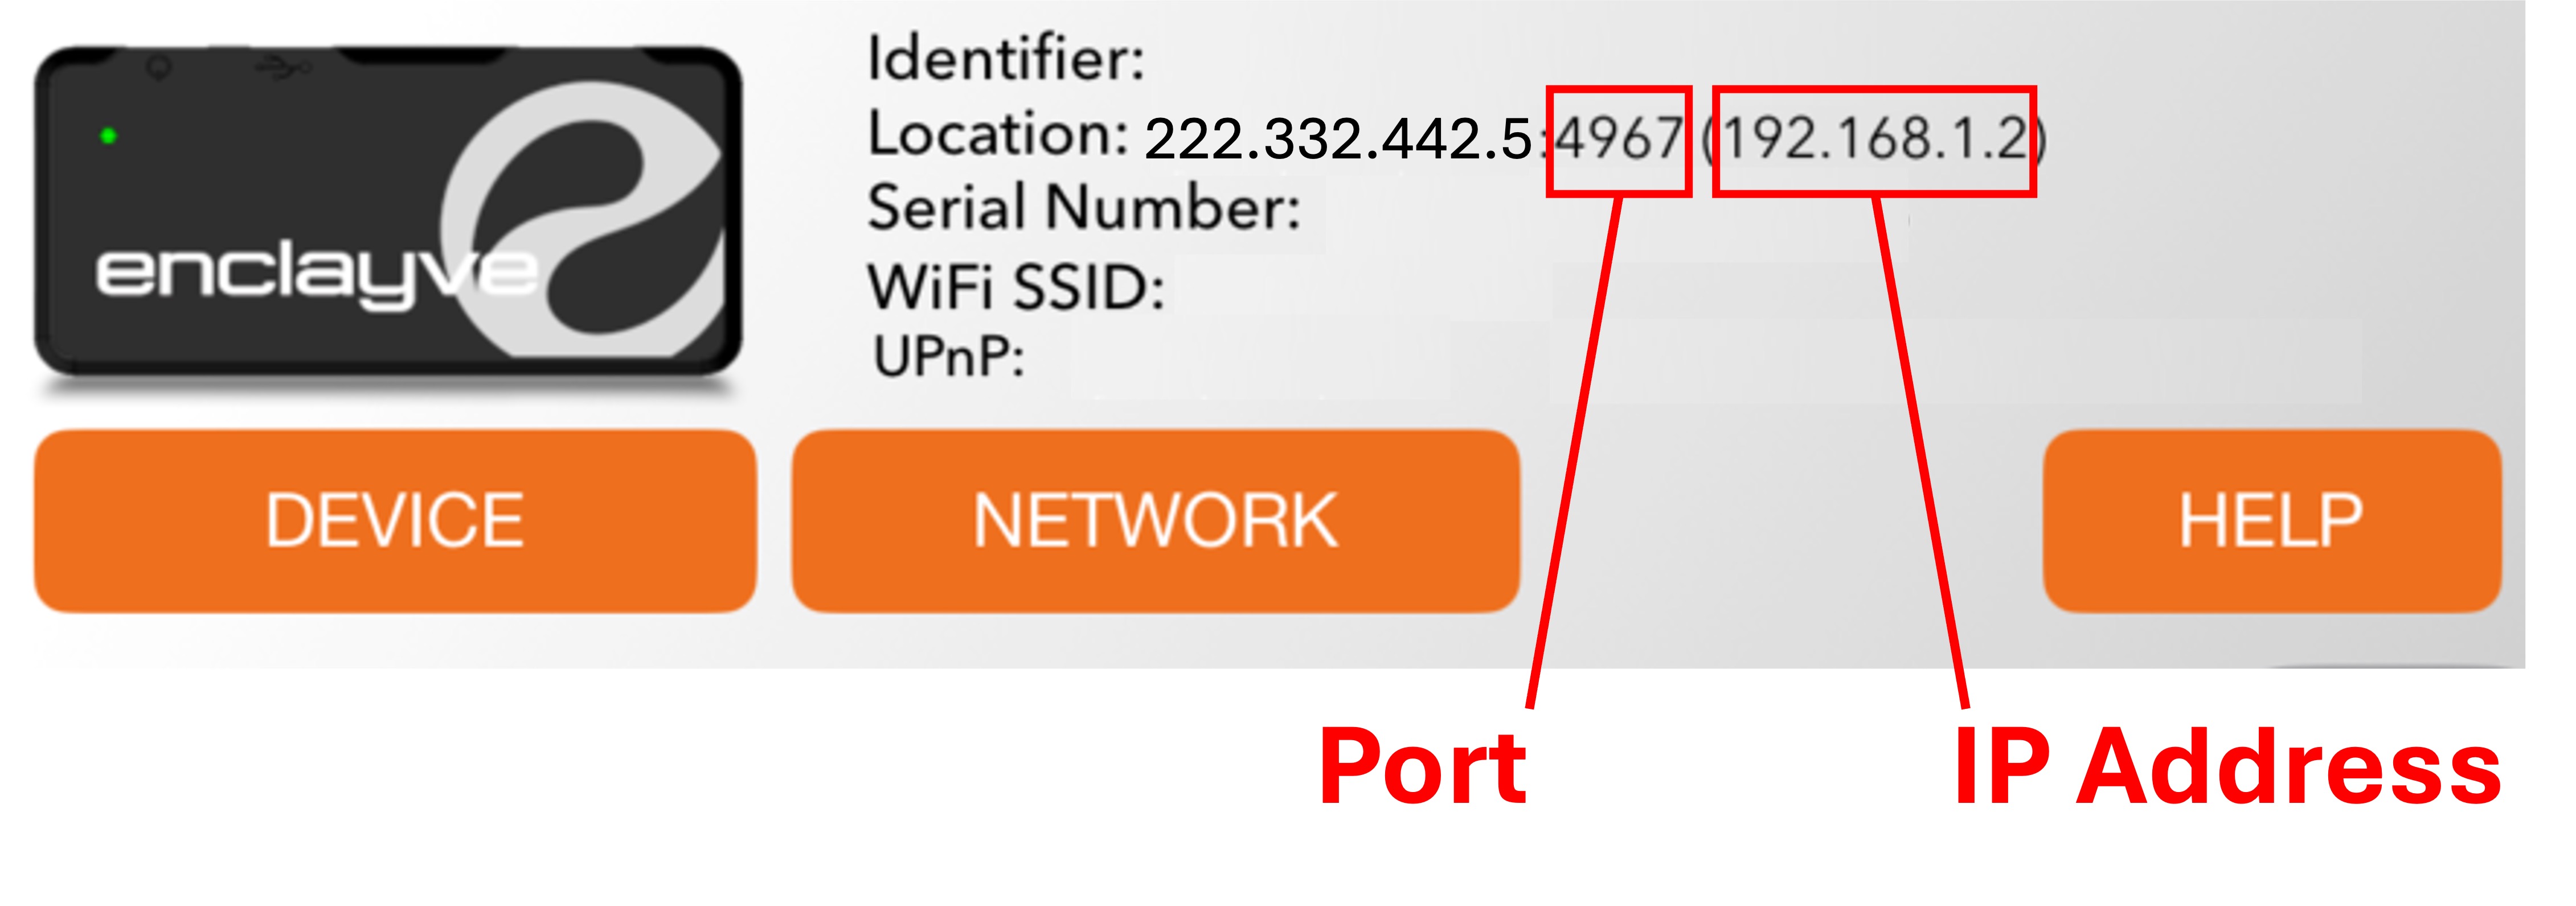 Set these values in your router, save them and verify it works using the Global Access test in the enclayve app (Tap on NETWORK, then Run Global Access Test).
IMPORTANT NOTE:
At times, the WLAN IP address of your device will change.
You must keep the port mapping at your router in sync with changes. Some routers can do this automatically (but not all).
However, if you enable UPnP instead, the enclayve device will automatically keep your router in sync.
Contact enclayve support at support@enclayve.com for our latest information.
| Service Name: | enclayve |
| Ports: | device port to device port |
| Device: | device IP address |
| Type: | TCP only |
At times, the WLAN IP address of your device will change.
You must keep the port mapping at your router in sync with changes. Some routers can do this automatically (but not all).
However, if you enable UPnP instead, the enclayve device will automatically keep your router in sync.
Enable UPnP
Xfinity/Comcast
Some (but not all) routers delivered with the Xfinity/Comcast Internet service have UPnP disabled by default and you must enable it. Here are the steps:
- Open a browser to your router's web interface. This is typically the IP address 10.0.0.1. The enclayve App tells you the correct address, which can also open the browser for you. However, you can type it directly into your browser. It will present you with a login page, where the default login is:
Username: admin
Password: password
(Usually it will ask you to change this password and log in again.) - Open the Advanced tab and chose Device Discovery.
- Click on Enable for UPnP and Enable for Zero Config and click on SAVE. This is shown below:
- Go back to the enclayve App and perform the setup again.
(Note - your screen may be different than the above)
Enable UPnP
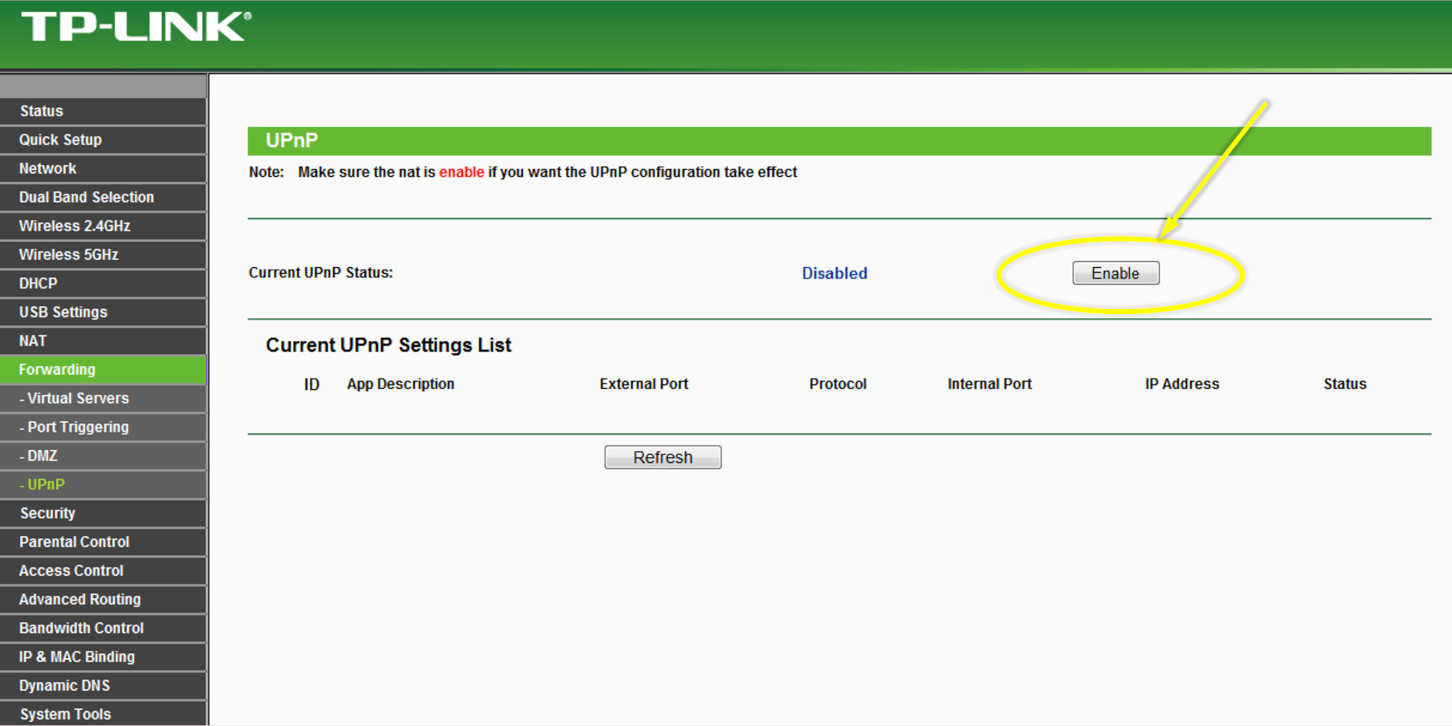
TP-LINK Routers
If you have purchased a TP-LINK router, it will typically have UPnP enabled by default. However since you are here, it was disabled and you must re-enable it again with the following steps:
- Open a browser to your router's login page.
- Open the NAT tab and chose UPnP. Tap on enable for UPnP and click on SAVE. This is shown below:
- Click the Enable and tap on Refresh. This is shown below:
- Go back to the enclayve App and perform the setup again.
(Note - your screen may be different than the above)
Enable UPnP
D-LINK Routers
If you have purchased a D-LINK router, it will typically have UPnP enabled by default. However since you are here, it was disabled and you must re-enable it again with the following steps:
- Open a web browser and type the IP address of the wirelessrouter in the address bar (default: 192.168.0.1). Press Enter.
- The default username is admin (all lowercase) and the password field should be left blank. Click OK.
- Go to the ADVANCED tab, then click on ADVANCED NETWORK
- Under the UPNP heading, tick the box labelled Enable UPnP
- Click Save Settings to apply the news ettings
Enable UPnP
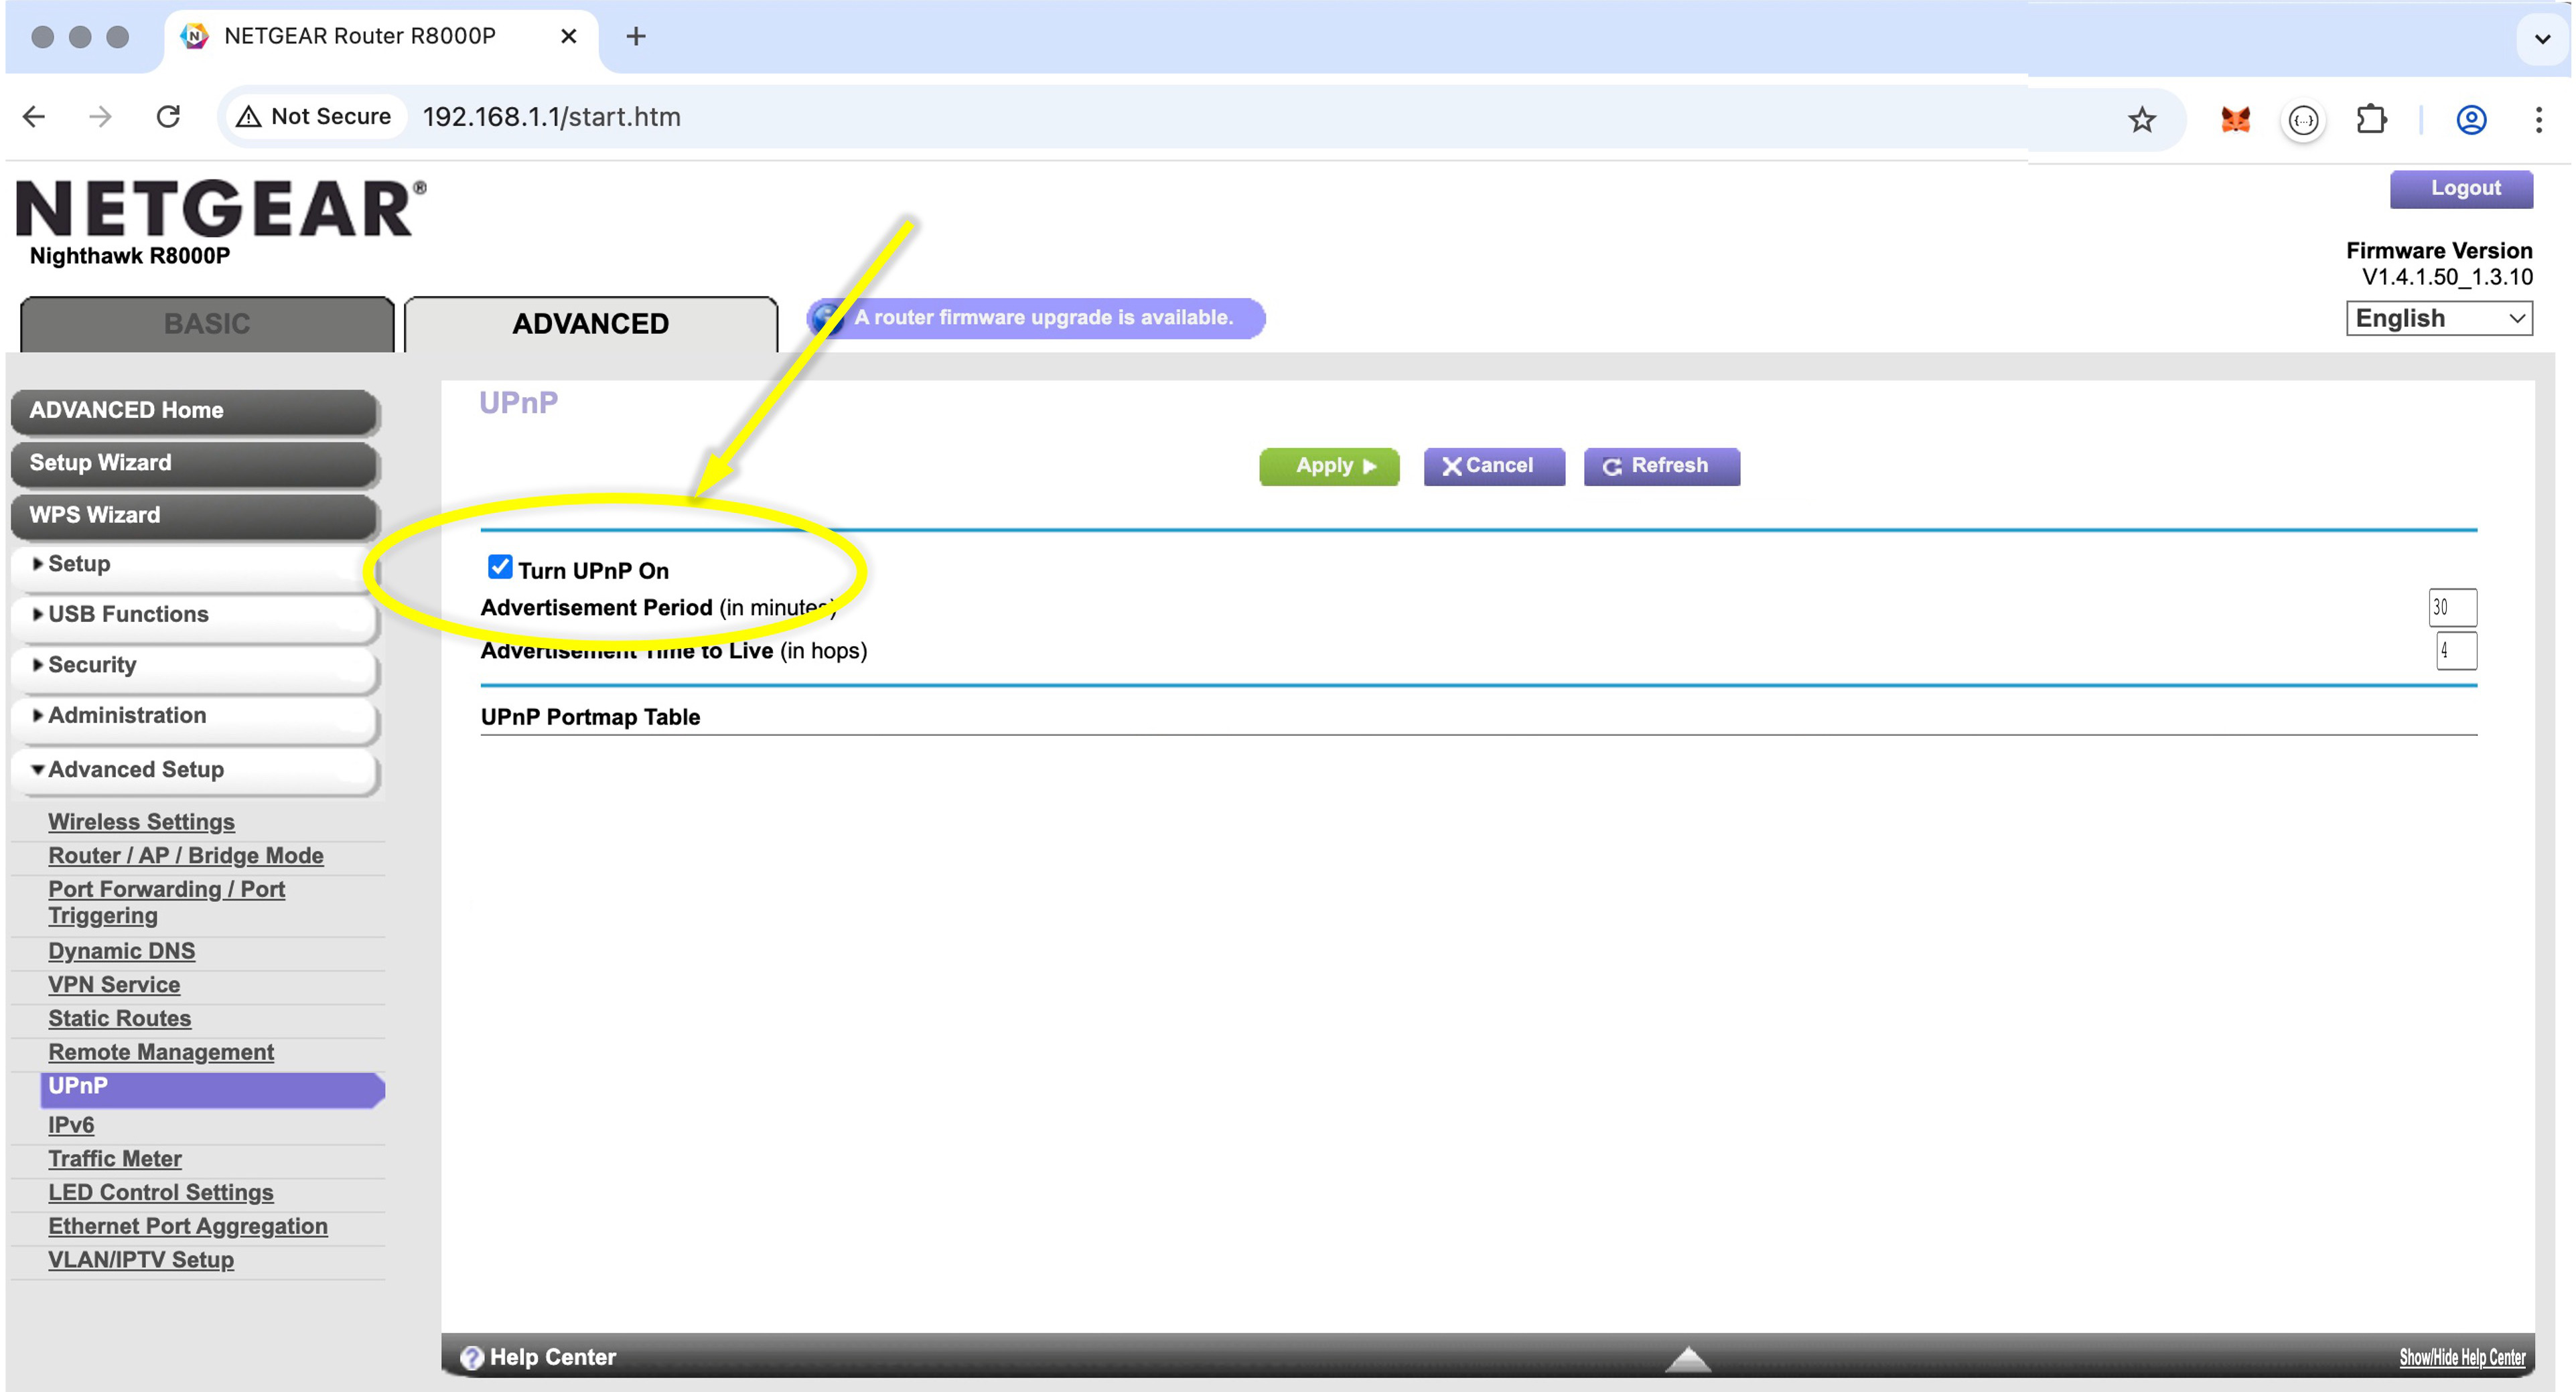
NETGEAR Routers
If you have purchased a NETGEAR router, it will typically have UPnP enabled by default. However since you are here, it was disabled and you must re-enable it again with the following steps:
- Open a browser to your router's web interface. This is typically the IP address 192.168.1.1 or 192.168.0.1 The enclayve App tells you the correct address and can open a browser for you. However, you can also type it directly into your browser. It will present you with a login page. The default login is:
Username: admin
Password: password
(In some models, the password is "1234" without the quotes) - Open the Advanced tab and select Advanced Setup. Select UPnP.
- Check the box labelled "Turn UPnP On" and click on Apply as shown below:
- Go back to the enclayve App and perform the setup again.
(Note - your screen may be different than the above)
Configure NAT/Gaming
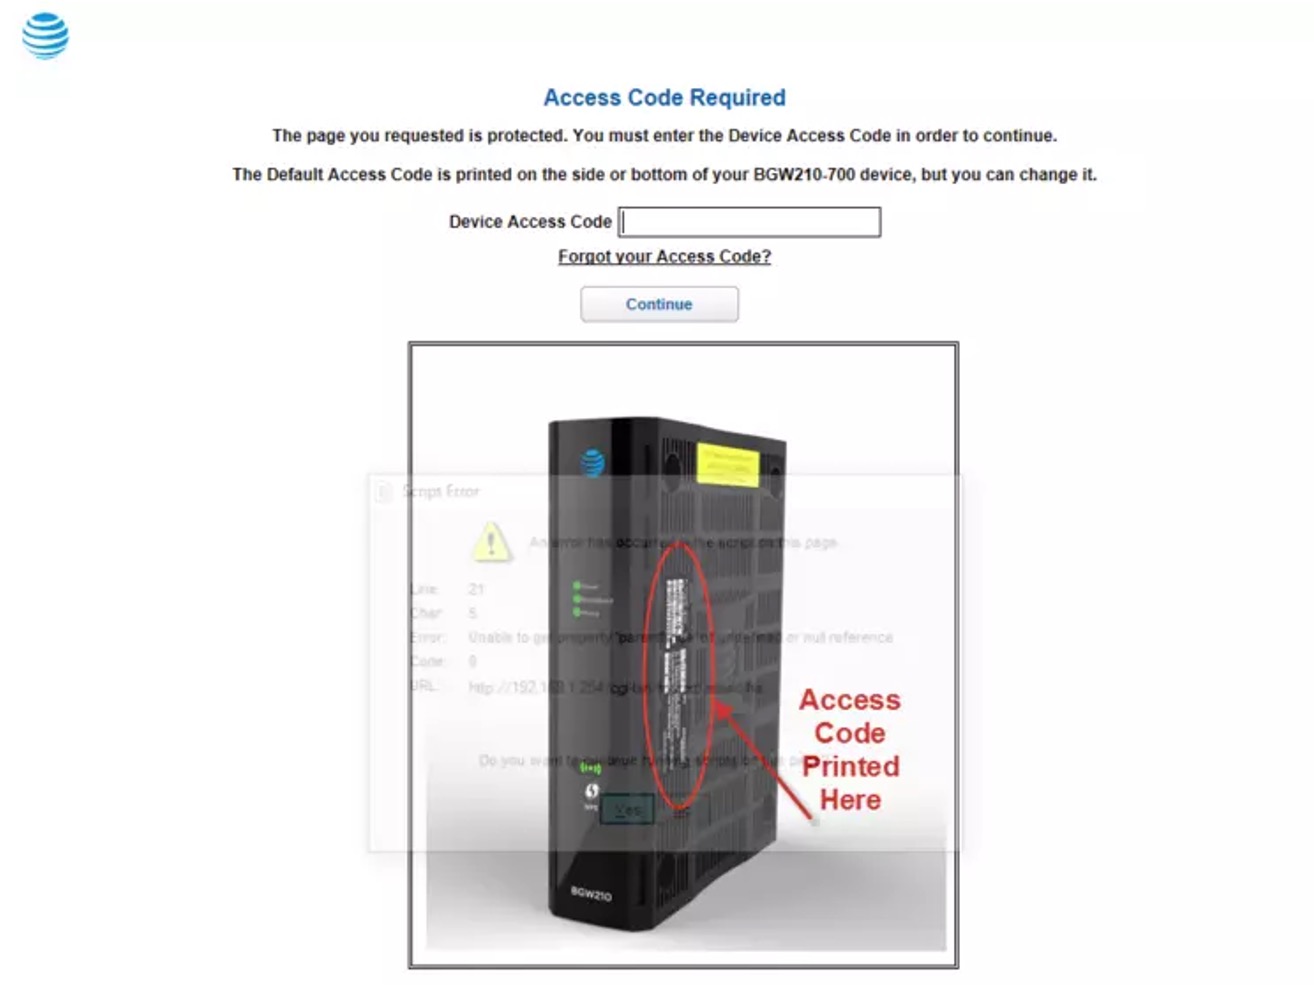
AT&T
Almost all routers delivered with the AT&T Internet service do not support UPnP.
Because of this, you will have to manually perform the steps that would have been done automatically for you. Here are those steps:
- Open a browser to your router's web interface, which is typically 192.168.1.254.
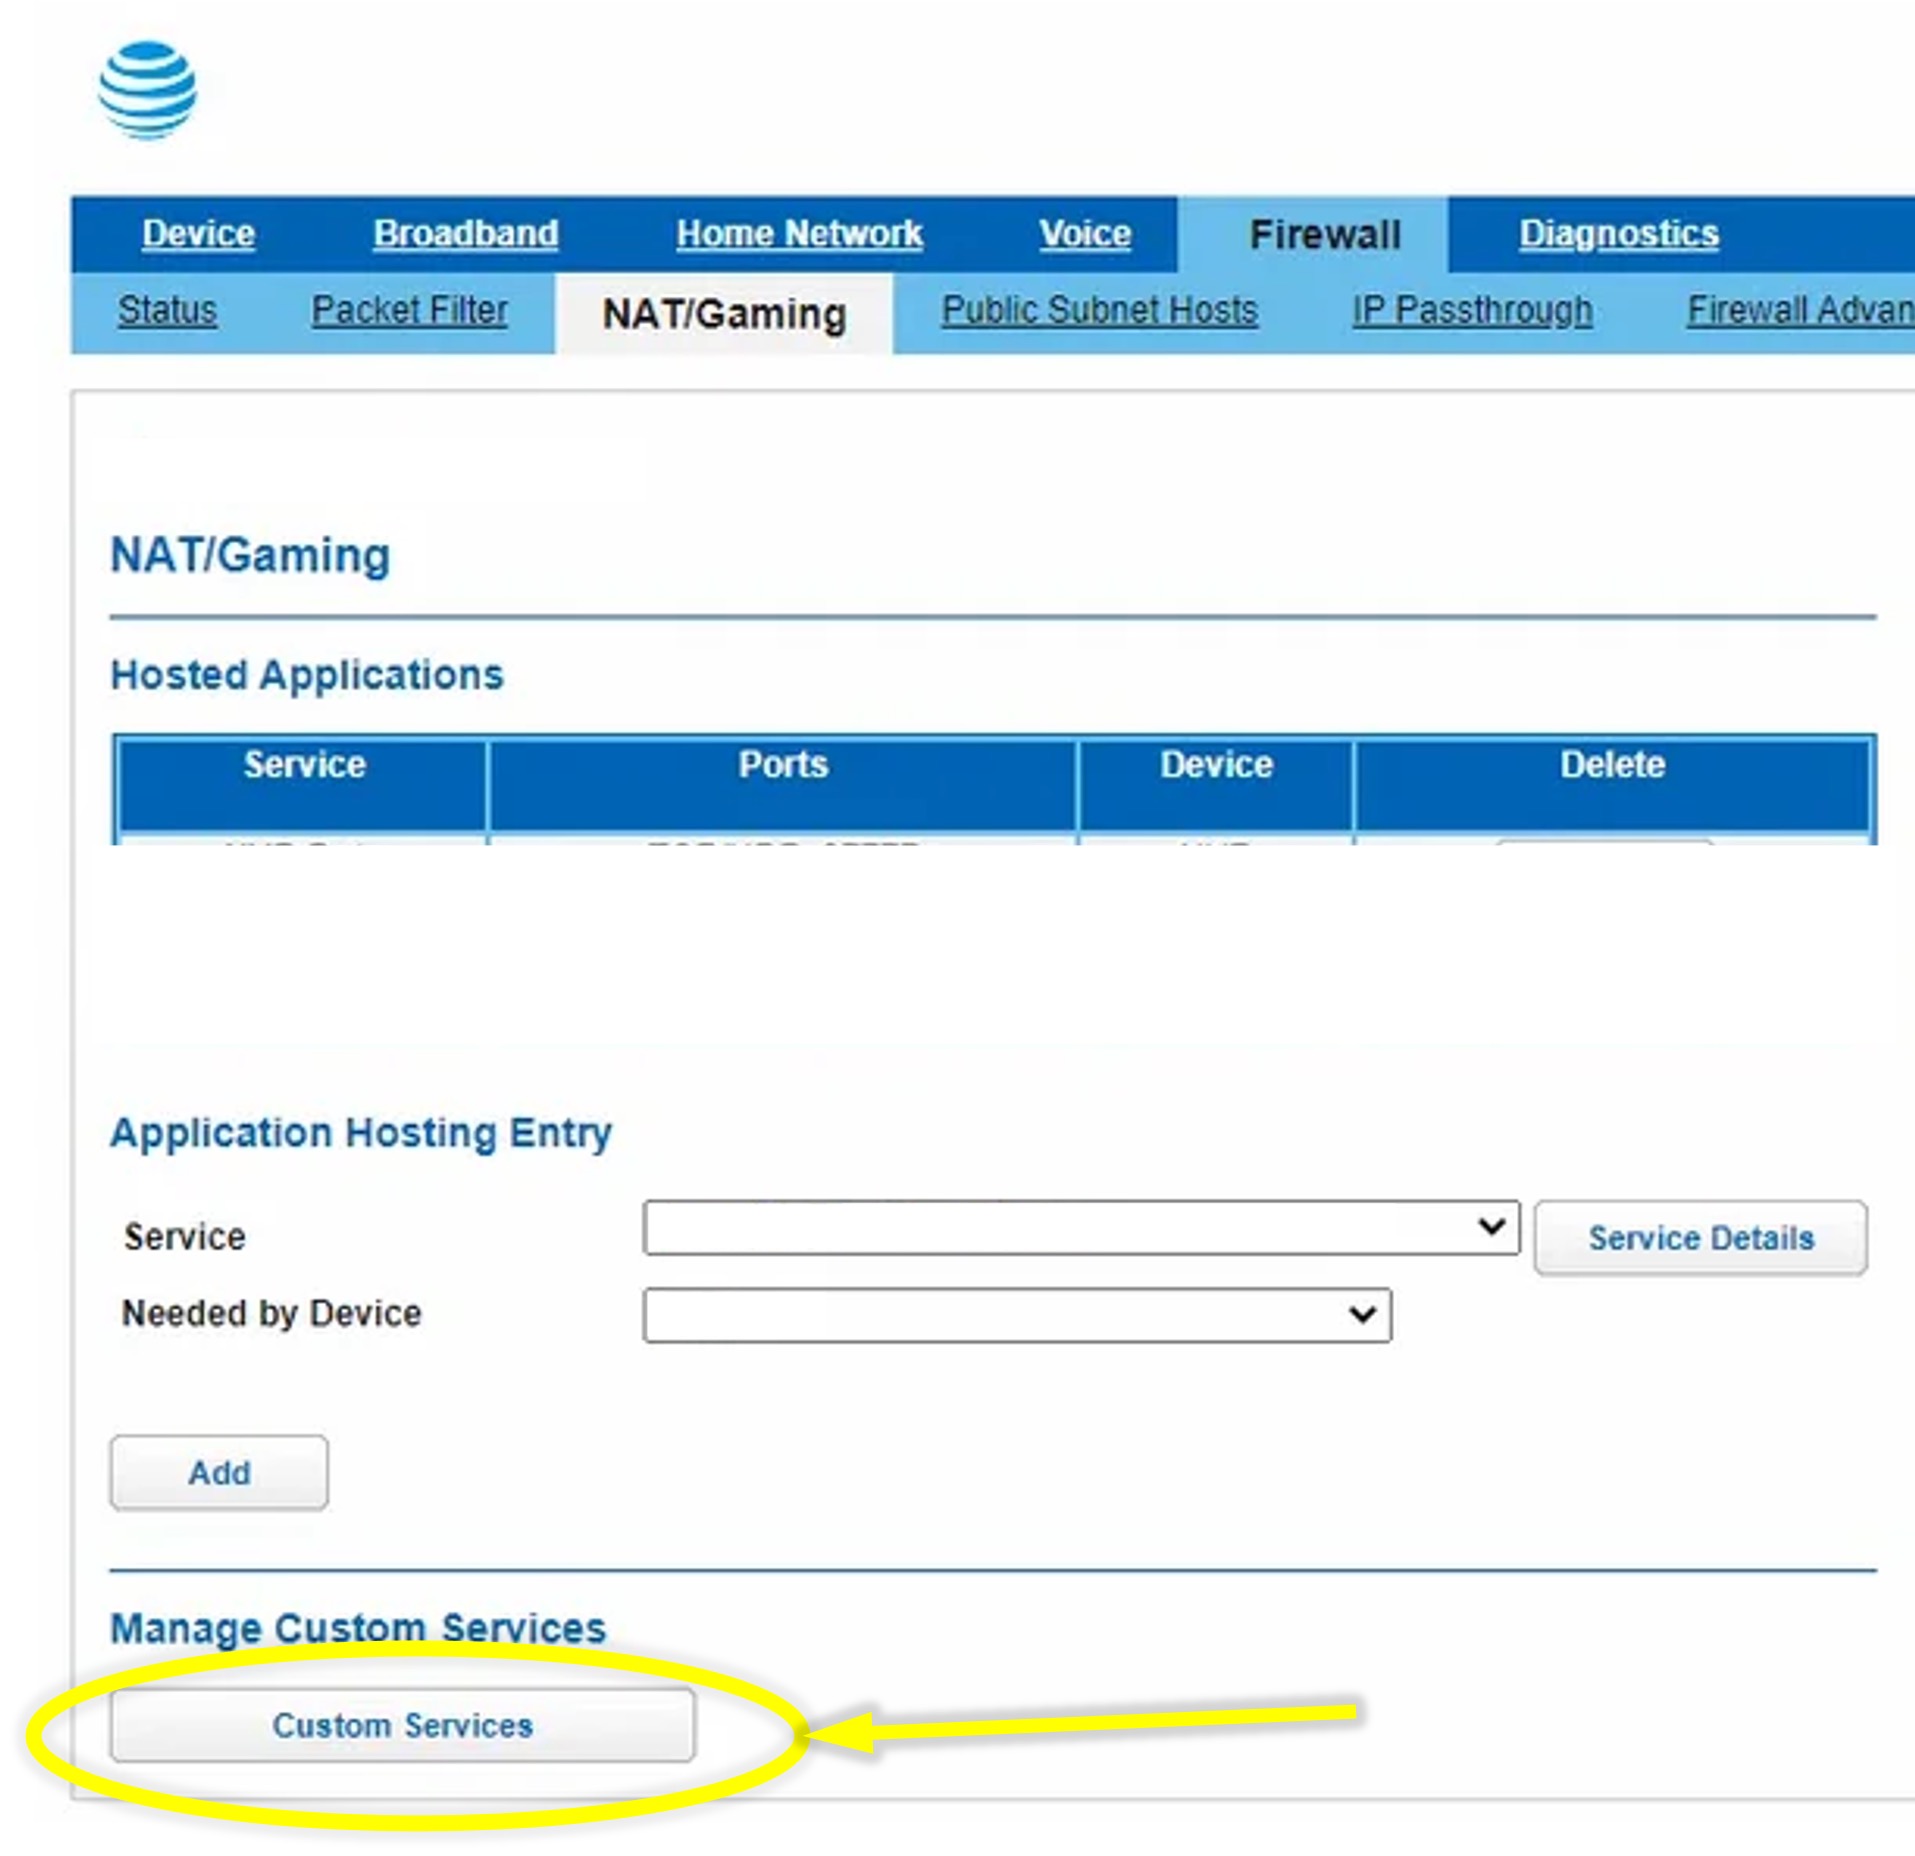
- Open the Firewall tab and chose NAT/Gaming. This will typically require you to enter an access code as per below:
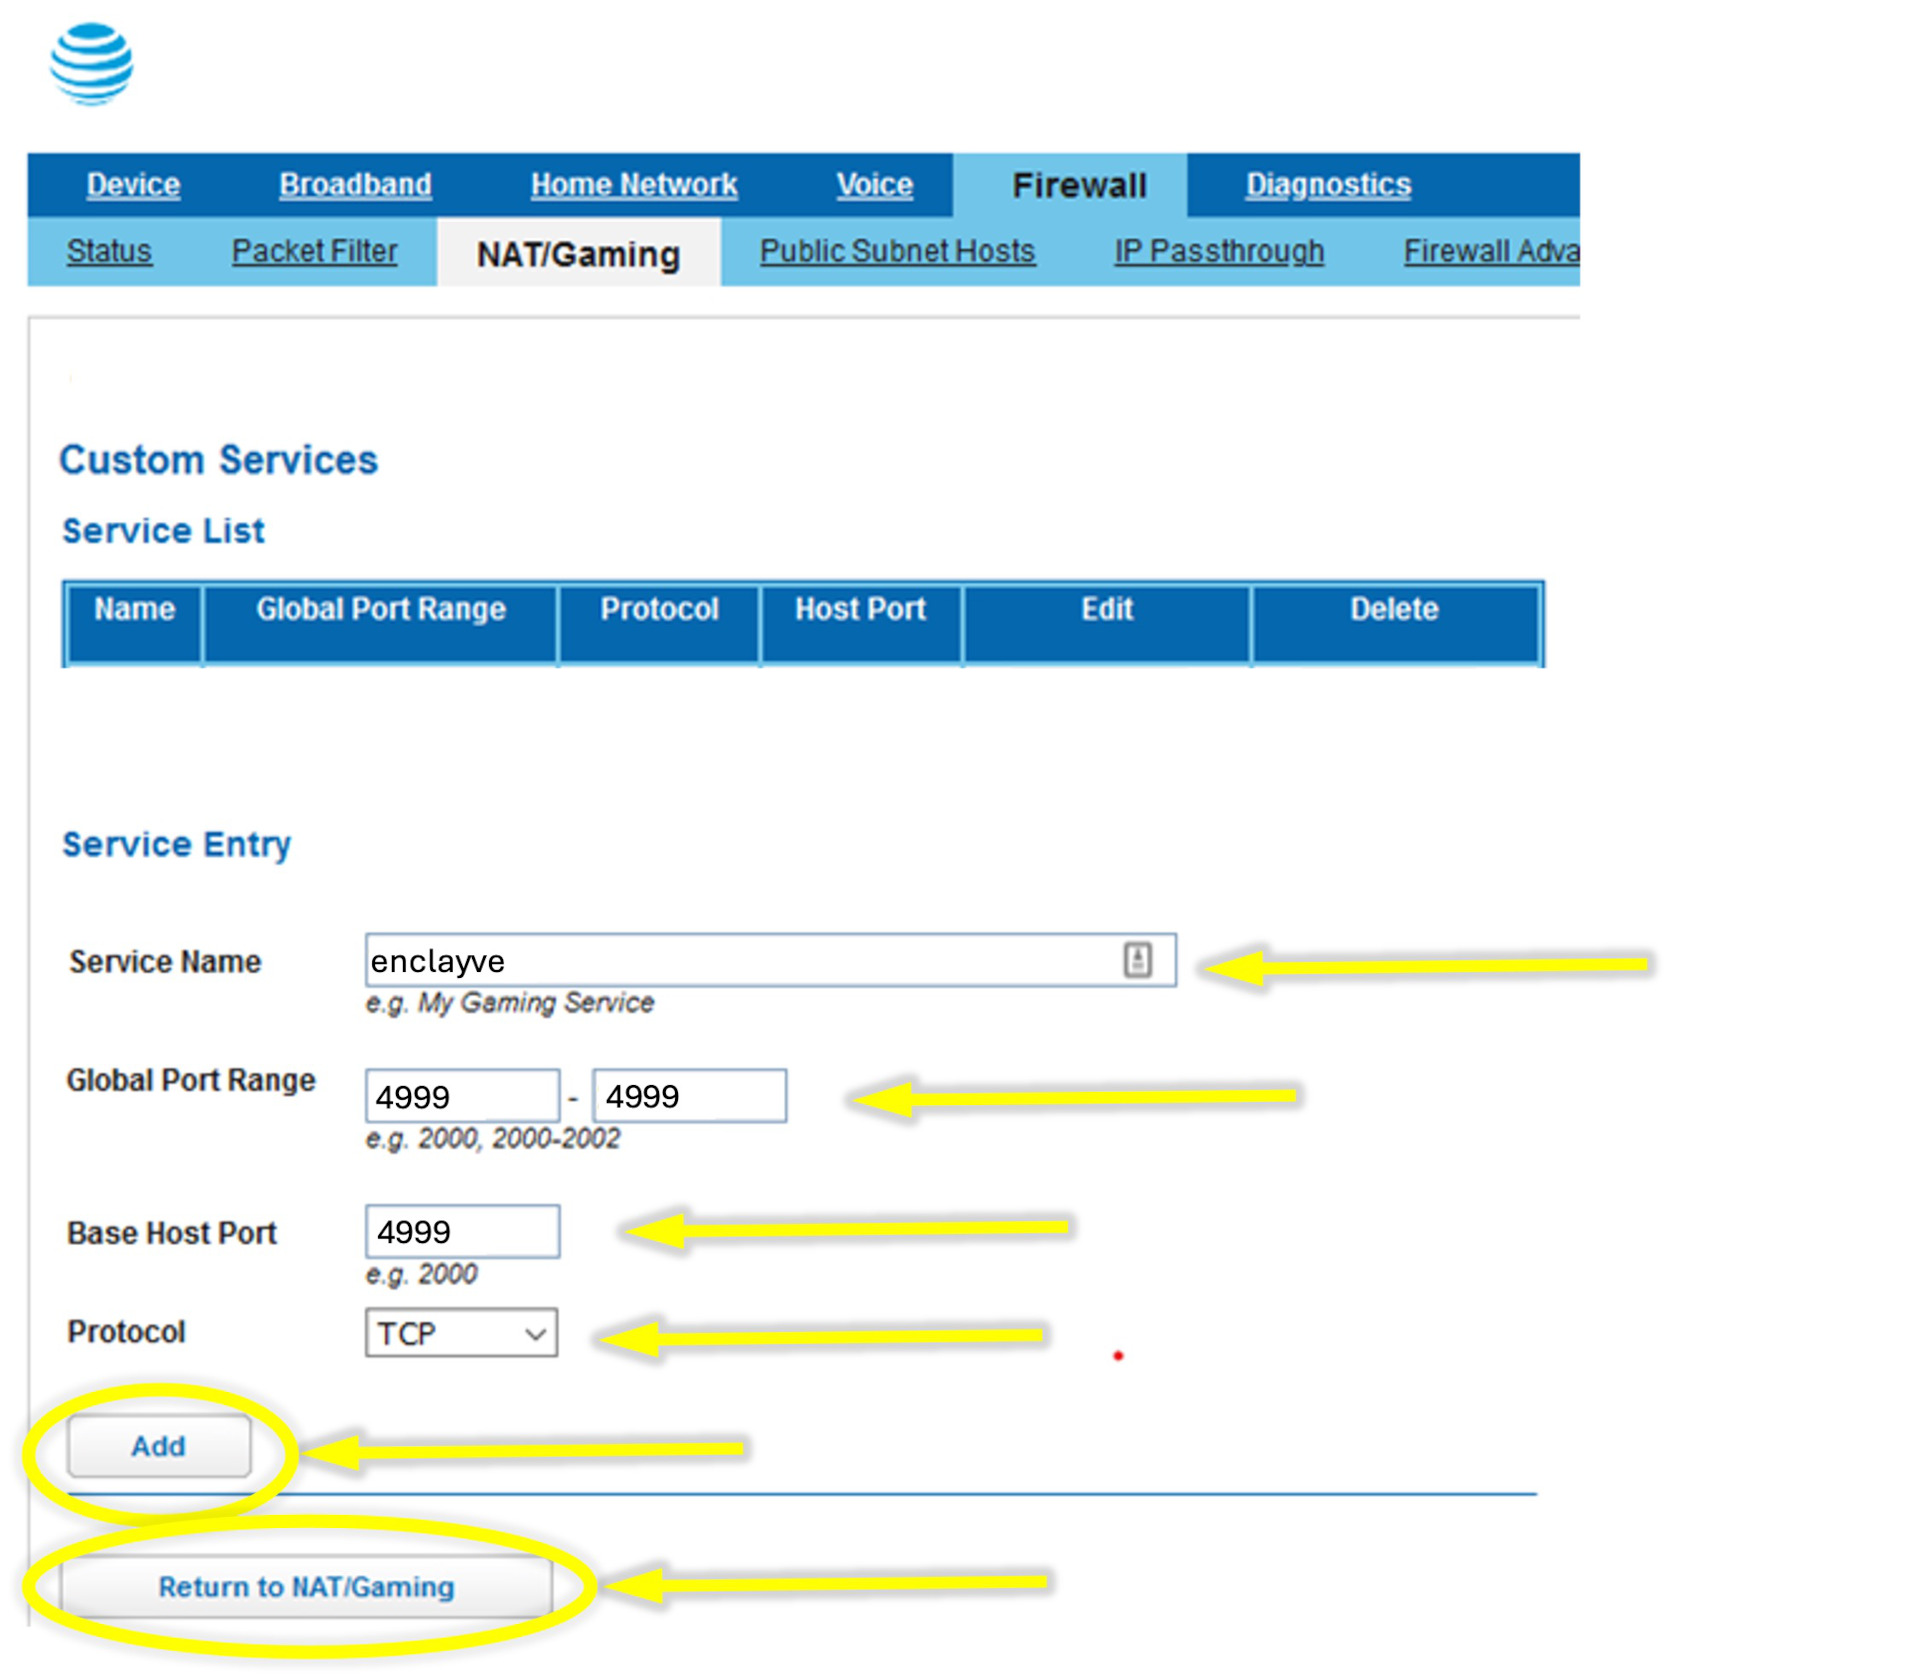
- You will create an enclayve custom service. Click on the Custom Services button.
- Enter the serivce information as shown below. Click on Add, then Return to NAT/Gaming.
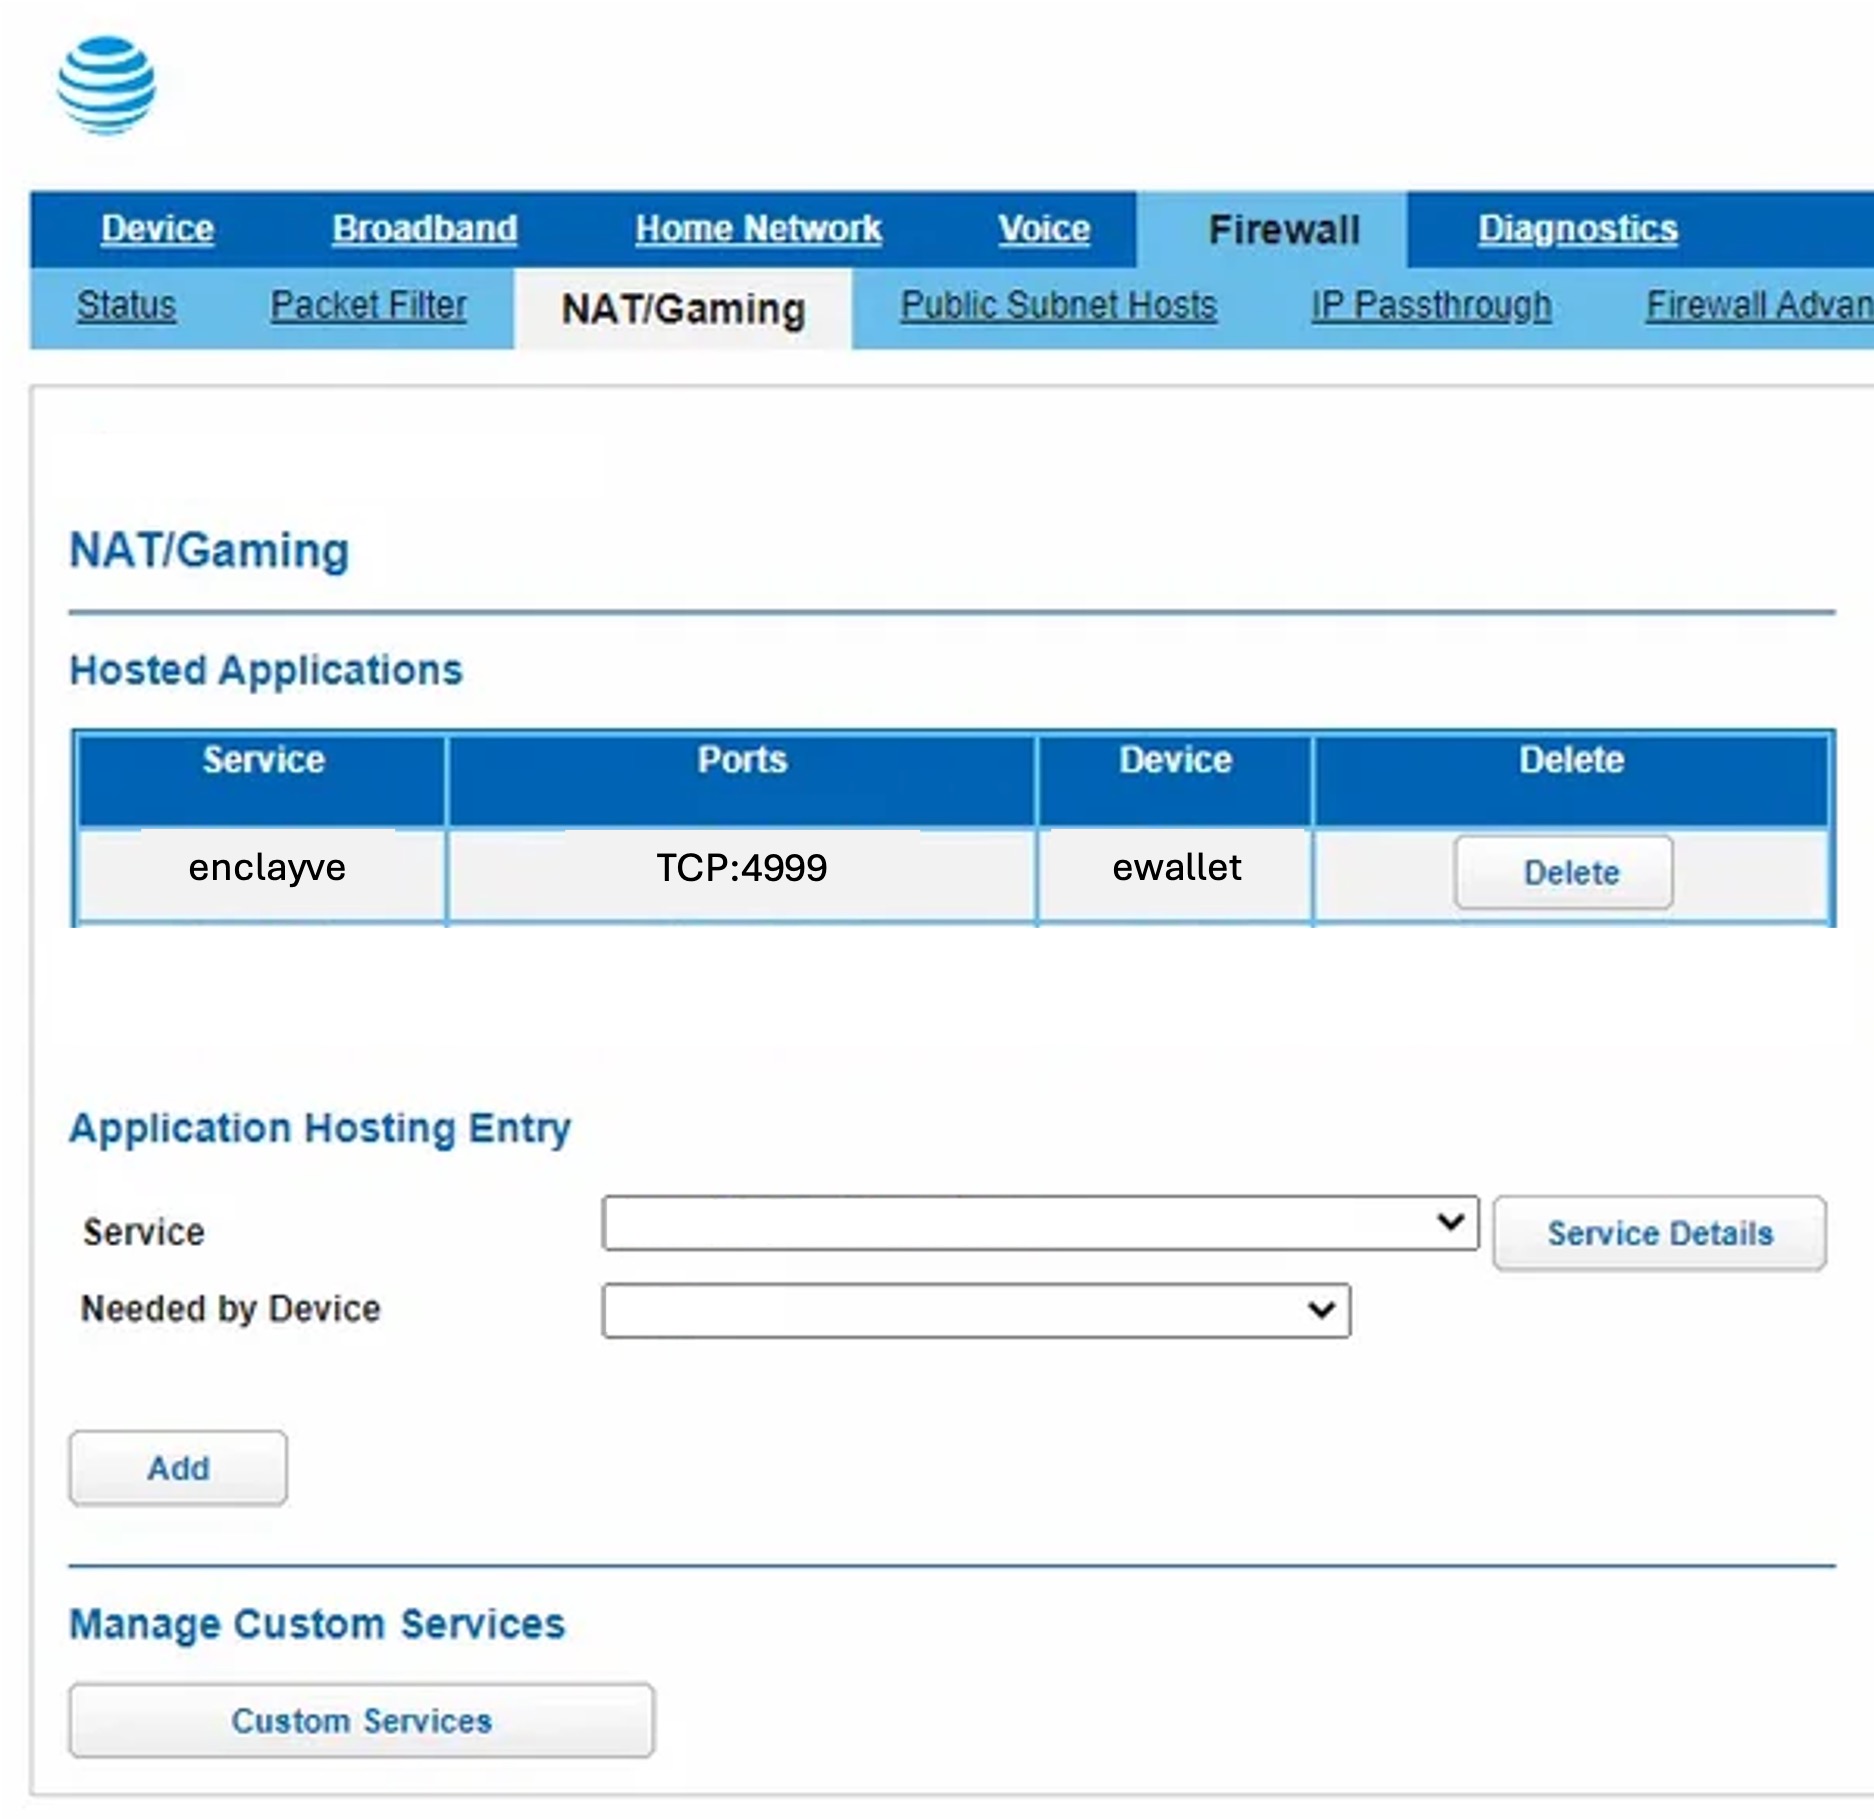
- You will now add the enclayve service to your enclayve device. Select the enclayve service from the Service drop-down. Select "ewallet" from the Needed By Device drop-down. Click Add.
- It should now appear similar to this:
- Go back to the enclayve App and perform the setup again.
(Note - your screen may be different than the above)
(Note - your screen may be different than the above)

(Note - your screen may be different than the above)
(Note - your screen may be different than the above)
Enable UPnP
General Instructions
Most all routers have a similar process for enabling UPnP. Consult your router's manual or your service provider's support page.
NOTE: Router documentation can sometimes refer to this as 'Port Mapping' or 'Network Address Translation' or NAT or 'Internet of Things' or IOT.
In general, the following steps are common:
- Open your router or service provider's management interface, one of these:
- Web Interface. Open a browser to your router's IP address (e.g. 192.168.1.1 or 10.0.0.1), or
- App. Open the app provided to you by your service provider or router manufacturer.
- Log in, using credentials or codes from your provider or printed on your device. Some routers have default credentials listed online (e.g. username:admin password:password).
- Go to a section called Advanced Settings or sometimes Firewall. Under those sections there is generally a UPnP tab or button to enable UPnP. In some cases this is known as IoT (Internet of Things)
- In some cases, you must also create a 'Port Mapping'. The enclayve App tells you exactly what you need to enter. The specific instructions above have details on how to do this for those cases.
- Save the changes and continue the setup in the enclayve App.
Enable UPnP
LinkSys Routers
If you have purchased a Linksys router, it will typically have UPnP enabled by default. However since you are here, it was disabled and you must re-enable it again with the following steps:
- Open a browser to your router's login page and log in.
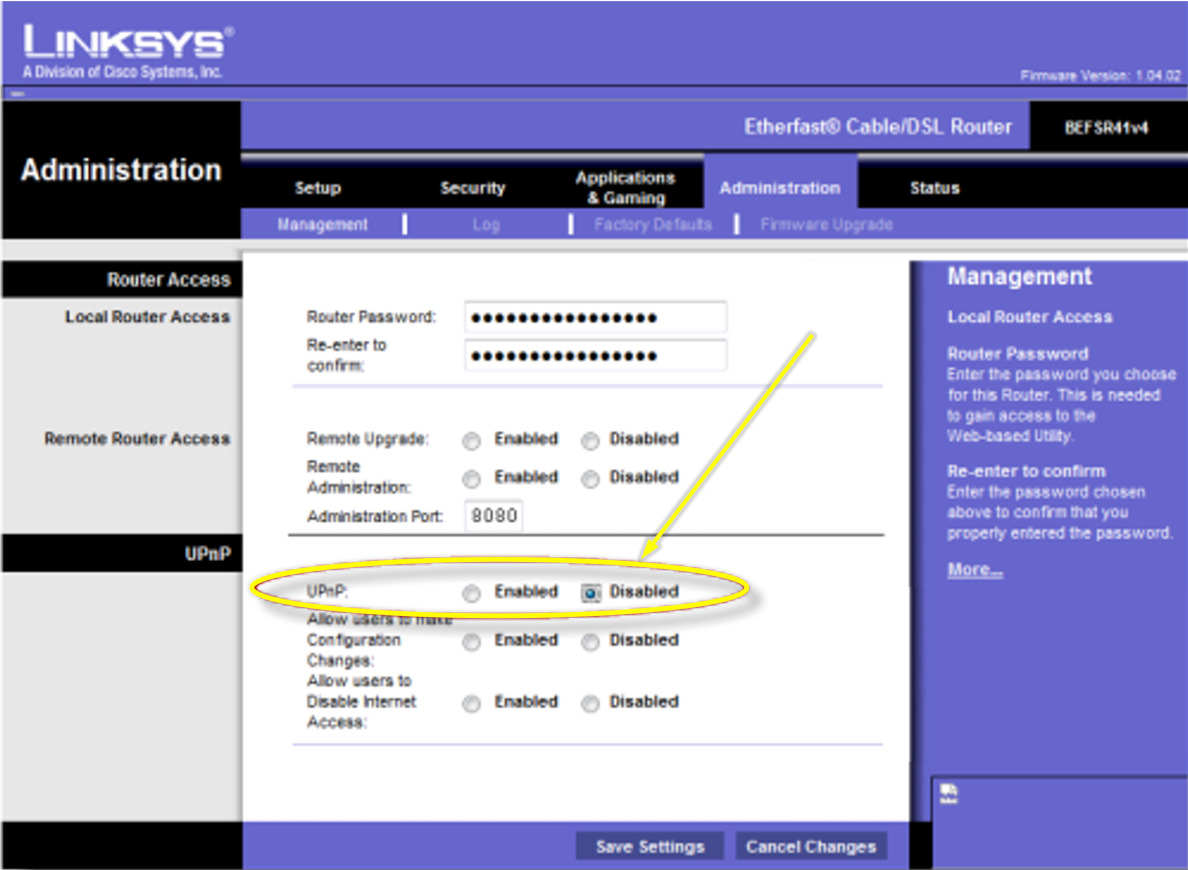
- Open the Administration Tab.
- Select Enabled for UPnP and click on Save Settings. This is shown below:
- Go back to the enclayve App and perform the setup again.
(Note - your screen may be different than the above)